I do apologize beforehand for the rant. I try not to use this space as my own personal soapbox, but I was reading this article on Slashdot, and I’m sorry, but I have to comment on this one because I KNOW I am not the only one who feels this way.
Let me tell you why I don’t go to the movies anymore.
-People
I go to the movies to see a movie. I typically go with my girlfriend. But, as we have realized, the public movie theater is no longer the place to go for dates. Apparently it is now the place to go if you’re an obnoxious focktard with a group of obnoxious focktard friends. Without fail, every time, we get stuck listening to a group of obnoxious teenagers giggling, laughing, outright screaming, throwing shit, and being generally disruptive. And if not, you got the fat bastards who laugh so frigging loud like every joke in the movie was comedy gold…. And strangely enough sometimes there’s not even a joke involved. My guess, their high… And this doesn’t even get me started on the theater staff, but I will spare you that one.
-Cell Phones
I suppose this has just as much to do with people as it does the technology itself, but how hard is it to NOT answer your phone in a movie. I go by the philosophy, if you call me, and I am busy, if its important you call back or leave a message. How hard is that concept for other people to grasp. If someone calls you in a movie, you don’t need to answer and tell them your in a movie, how the movie is, what’s going on, etc. And text messaging in a movie is just as disruptive. Nothing like shifting focus during crucial parts of a movie because the dumb ass in front of you in text sexing their girlfriend.
-Facilities
Movie theaters are GROSS. Gum on the seats, that nasty smell of popcorn buttern and urine in the theaters, and half the time either the projectors aren’t focused correctly, or the surround sound isn’t calibrated or even turned on. Now I am a video/audio phile. If that stuff isn’t done just right, I get annoyed.
-Advertisements
This was the last straw as far as I was concerned. Last time I went to a movie, I had to endure 30 frigging minutes of advertising. Its bad enough that companies bombard us with shit advertising for crap that we don’t want and don’t need in our radio, television, on the drive to work, and are constantly trying to find new ways to encroach upon the sanctity of our daily lives. I used to enjoy movie previews, but when advertisements crept in, I had enough. As a result, I have boycotted all subsequent products from the sponsoring companies (Pepsi, Coke, and Turner Broadcasting can all kiss my ass) for intruding upon my time. Eventually consumers will realize something; companies in a capitalist society will only do something so long as it is profitable. This is why spam is so prevalent. If companies didn’t make money off of it, they wouldn’t do it. So the way I look at it, if I can get enough people behind me to boycott products that advertise like this, they will get the hint and stop.
So what do I do? I wait for the DVD release. Then I either rent it or buy it based on reviews, take the movie home to my nice home theater with a wall sized screen, home theater seating (which is nice because is doesn’t have the gum that movie theater seats seem to have), with my kegarator, and the power to throw out people I find unruly from my domicile and watch my movies in peace. No obnoxious teenagers, fidgety old people, rude service, advertisements, overpriced food, or any other inconvenience that comes with the movie going experience. I know the movies looks and sounds exactly the way it was meant to with a fully optimized adjustment for both the screens and the surround sound setup.
I do make one exception as far as theaters go. I do like to go to the Alamo Drafthouse here when I go see their cult movies, order a beer, and that kind of behavior is expected. And with that, they don’t bombard me with advertisements.
So if the theaters are a little upset about the decline in sales, and the speed up of DVD releases, too bad. Fix your problems, and I might consider going back. And while your at it, quit showing the crappy movies that Hollywood thinks we all want to see. I imagine that the poor quality of movies has a lot more to do with the decline than anything else.
Thursday, March 30, 2006
Security/C#: Demonstration of Steganography Messages to Evade IDS Detection
In response to a discussion with Taosecurity author Richard Bejtlich I had some time back in regards to botnet techniques used to evade detection, I have come up with a very simple technique that can be used to circumvent firewalls and IDS systems, and still allow bots to receive commands in a bot-net. I’ve been putting off posting this article for some time since I wanted to add more to it (work in progress since about October, I believe). I really wanted to do more with it, however time just didn’t allow me to research the issue any further. However, I do feel that I have collected enough information to accurately demonstrate this concept; although I had to leave out some of the features I wanted to demonstrate.
This technique uses steganography to embed a simple command protocol into image files. When combined with methods for determining proxy configurations (Windows stores this internally, you can set them under Internet Explorer under Tool, Internet Options, Connections, and Lan Settings, or under the Control Panel), clients can use the existing egress rules to retrieve said embedded file remotely through approved outbound ports and proxy servers. To any passive observer, this is simple web traffic retrieving graphics that are embedded into everyday web pages. Clients than can be set to retrieve graphics from a location or locations at random or set intervals.
This program is written in Visual C# 2005 Express. It makes use of the .Net Steganography library found here. I also use the example program from these libraries to embed my message into the image file, although I could just as easily custom written something for a more elaborate protocol. But for demonstration purposes, this will do nicely.
The protocol designed in this demonstration is very simple, it will only display a message box, or it will open notepad.exe, depending on the message embedded into the image file. The protocol source is below.
namespace Protocol
{
class protocol_class
{
const int POP_UP_WINDOWS = 1;
const int RUN_NOTEPAD = 2;
public void processCommand(int inCommand){
switch (inCommand)
{
case POP_UP_WINDOWS:
System.Windows.Forms.MessageBox.Show("Command Recieved");
break;
case RUN_NOTEPAD:
System.Diagnostics.Process.Start("Notepad.exe");
break;
}
}
}
The main program will utilize the System.Timer.Timer component to trigger a function once every 10 seconds. Since this program is a console program and is not using the graphical designer, I will need to manually assign an event handler to the Elapsed event.
The Event Handler will basically parse the given Stego Bitmap to retrieve the commands and process using the Protocol_Class defined above. It passes the results of the Steganography libraries Decode function to the processCommand function to execute the given command. The Main source file for this example is below:
/****************************************************************************
* Author: John Ward
* Date: 01-09-2006
*
* This program will retrieve a steganography image, and respond to the embedded
* commands inside of the undecoded message
* **************************************************************************/
using System;
using System.Collections.Generic;
using System.Text;
using Steganography;
using Protocol;
//Name of the program
namespace ConsoleApplication1
{
class Program
{
//We need a general System Timer to use throughout the class
private static System.Timers.Timer t = new System.Timers.Timer();
//Main function for command line
static void Main(string[] args)
{
//Enable the timer and set the interval for 10 seconds
t.Enabled = true;
t.Interval = 10000;
//Assign a new event handler to the Elapsed method
t.Elapsed += new System.Timers.ElapsedEventHandler(t_Elapsed);
//Start the timer
t.Start();
//Loop repeatably
while (true) ;
}
//The evant handler for the timer intervals
static void t_Elapsed(object sender, System.Timers.ElapsedEventArgs e)
{
//The protocol class that will respond to the messages encoded in each image
protocol_class p = new protocol_class();
//Use the protocol class method to respond to the decoded message at this location, using password test
p.processCommand(Decode("C:\\Documents and Settings\\Administrator\\My Documents\\Blog Entries\\Steganography Protocol\\Steganography Source\\sguil_window_of_portscan_2.bmp",
"test"));
}
//The decode method for this class, based off of the Steganography
//class built by
private static int Decode(string fileName, string password)
{
// Open the stego file
IStegoFile stego = new BMPStegoFile(fileName, password);
//REturn the hidden message as a 16 bit integer
return Convert.ToInt16(stego.HiddenMessage);
}
}
}
And that is basically it. Using the source code for the image encoder included with the .Net Steganography library, and using a generic password of “test”, I embed a simple message of either “1” or “2” into the graphic. The Convert.ToInt16() function will take care of changing it from a text to a numeric representation for the Protocol classes processCommand function.
So basically, all this does is open a Bitmap file, decode the stenography message, and pass the resulting message to the protocol class for handling. More sophisticated techniques can be employed, and steganography has grown as a field, so different graphics formats, MP3 files, or even specially encoded HTML headers can contain the message. This deviates from the traditional botnet where the client connects to an IRC channel or some other central media to receive commands in real time. In this method, the attacker loses real-time response and gains stealth. With a reasonable interval of time set for the clients, the attacker can have their nefarious commands executed in a short amount of time. By combining this code with some disguised distribution method, lets say an image thumb-nail browser for an online graphics catalog, the program can be distributed widely, and its online image grabbing behavior would never be suspect until the mass traffic adding to a DDOS attack came from the client machine. And even if it were, your normal Net-Sec analyst would only see an image file and have no clue that the image file contained a steganography-encoded message. There are tools for detecting the presence of steganography in image files, however I have not seen any that do so passively over the wire. AS the program stands, the console window is still visible, however there are methods for hiding it and the process list entry making it very difficult to detect if it were to stay resident after execution.
On a side note, this also gave me a chance to demonstrate a few C# concepts, such as using the System.Timers class and setting up custom event handlers for the Elapsed method, and creating and instantiating a simple class.
Wednesday, March 29, 2006
Actuate: Setting up IServer Cluster
I was tasked with setting up a cluster with our Actuate servers. While setting up a cluster in Iserver, had a few pitfalls I was not expecting, which this article will chronicle.
There are a few pre-requisites that needed to be addressed before I could start. First issue that we came up against was a licensing issue. The license that we had been issued for our cluster had the incorrect number of CPU’s and incorrect options enabled. Licenses work on a per CPU basis, and the license that we needed to have needed to accommodate the total number of CPU’s in the cluster across all machines and have the appropriate options for load balancing (eSpreadsheet, Analytics, Actuate Query, etc). Fortunately, Actuate support was very accommodating and their turn around in getting this matter resolved was resoundingly fast. This is one of the reasons I always hold Actuates support group up as a model that other companies should mimic.
Before beginning the actual cluster setup, be sure to backup the entire configuration files under the “<Actuate Root>\Iserver\etc” folder. As I found out, once you start the process, it is very easy to break and very difficult to recover from unless you have these backups.
Setting up the cluster is laid out pretty straight forward in the Actuate manuals. There is one prerequisite, however, that I could not find mentioned, and that is that you must set up file shares for the partitions that are to be clustered. For the clustering to work, all nodes in the cluster need access to the partitions for the volumes they will load balance or fail-over for. To Actuates benefit, you can use UNC names rather than actually having to map a drive letter for the partitions, so you will only need to create the shares for later use. I illustrate this later.
First step is to log into the Actuate management console as an administrator. Once you are logged in, click on the button labeled “Create Cluster”. In my screenshot below, the button is grayed out, but that is because I already clicked on this. As far as the screen that follows, I just kept all options default.

Figure 1. Create Cluster Button
Next, I click on the servers tab on the right hand side, bringing up my list of servers. If I had not clicked on “Create Cluster”, the “Add Server” button on this page would be grayed out. Before I proceed, I make sure my slave machines Actuate process is stopped from within the Actuate Management Console; otherwise Actuate will not allow it to be added.

Figure 2. Servers Menu
For the Server options, I added the DNS name of my server into the Hostname or daemon IP address with a port of 8100. For the server IP address, I used the DNS name of the cluster master, and set the Application container process listener port to 8900. I checked all boxes for services except message distribution. Once completed, I clicked on the partitions tab, and entered the partition information for each of the shares to be clustered.
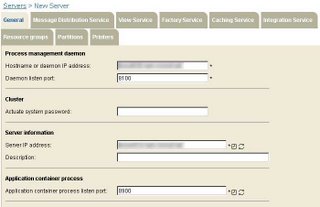
Figure 3. Server Settings
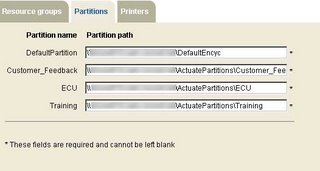
Figure 4. Partitions
Once I click on Apply, the remaining fields will fill in automatically. It is at this point that I enable the message distribution service, go into the Message Distribution tab, and enter the cluster master as the server address.
Once I hit OK, I get back to the Servers tab. I can see my newly added slave system sitting there. I try to start it up, but I get an error about not being able to bind to a server IP address. Turns out, I entered the wrong address for server IP address. I click on properties, and change this to the slave systems DNS name. Once complete, I go back to the servers tab, and see my red flag again. I click on start-up and the server is now online.
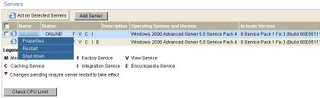
Figure 5. Servers with new Cluster Node
However, I can see that the message distribution service is still not running. When I go to enable it, I get the same error message about failing to start with an invalid SOAP IP. So I shut the slave server down, go back into the message distribution service tab, and enter the slave systems DNS name. Then I go back to general properties and click on enable for the message distribution service. I click on Apply, OK, and restart the slave server. Now it is online with the message distribution service. I am not sure if that is correct, but it started, so that is definitely a step in the right direction.
Once the server is online, I also set the new cluster server as the fail-over system for all the Actuate volumes. Now my cluster is complete. I verify this by going into the System Resource Group tab, and verifying that the appropriate numbers of factories are assigned to both servers.
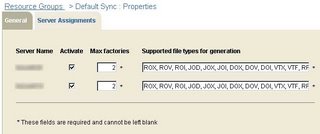
Figure 6. System Resource Assignment
There are a few pre-requisites that needed to be addressed before I could start. First issue that we came up against was a licensing issue. The license that we had been issued for our cluster had the incorrect number of CPU’s and incorrect options enabled. Licenses work on a per CPU basis, and the license that we needed to have needed to accommodate the total number of CPU’s in the cluster across all machines and have the appropriate options for load balancing (eSpreadsheet, Analytics, Actuate Query, etc). Fortunately, Actuate support was very accommodating and their turn around in getting this matter resolved was resoundingly fast. This is one of the reasons I always hold Actuates support group up as a model that other companies should mimic.
Before beginning the actual cluster setup, be sure to backup the entire configuration files under the “<Actuate Root>\Iserver\etc” folder. As I found out, once you start the process, it is very easy to break and very difficult to recover from unless you have these backups.
Setting up the cluster is laid out pretty straight forward in the Actuate manuals. There is one prerequisite, however, that I could not find mentioned, and that is that you must set up file shares for the partitions that are to be clustered. For the clustering to work, all nodes in the cluster need access to the partitions for the volumes they will load balance or fail-over for. To Actuates benefit, you can use UNC names rather than actually having to map a drive letter for the partitions, so you will only need to create the shares for later use. I illustrate this later.
First step is to log into the Actuate management console as an administrator. Once you are logged in, click on the button labeled “Create Cluster”. In my screenshot below, the button is grayed out, but that is because I already clicked on this. As far as the screen that follows, I just kept all options default.
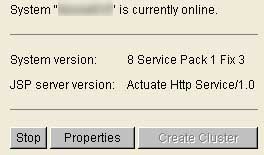
Figure 1. Create Cluster Button
Next, I click on the servers tab on the right hand side, bringing up my list of servers. If I had not clicked on “Create Cluster”, the “Add Server” button on this page would be grayed out. Before I proceed, I make sure my slave machines Actuate process is stopped from within the Actuate Management Console; otherwise Actuate will not allow it to be added.
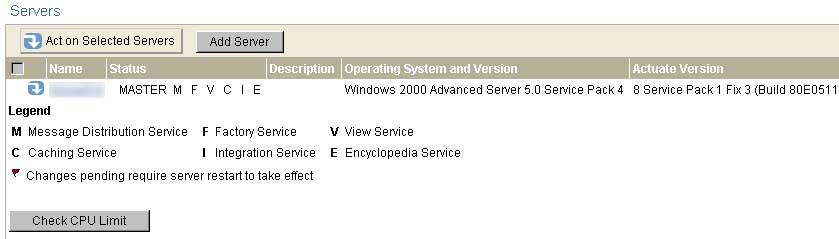
Figure 2. Servers Menu
For the Server options, I added the DNS name of my server into the Hostname or daemon IP address with a port of 8100. For the server IP address, I used the DNS name of the cluster master, and set the Application container process listener port to 8900. I checked all boxes for services except message distribution. Once completed, I clicked on the partitions tab, and entered the partition information for each of the shares to be clustered.

Figure 3. Server Settings

Figure 4. Partitions
Once I click on Apply, the remaining fields will fill in automatically. It is at this point that I enable the message distribution service, go into the Message Distribution tab, and enter the cluster master as the server address.
Once I hit OK, I get back to the Servers tab. I can see my newly added slave system sitting there. I try to start it up, but I get an error about not being able to bind to a server IP address. Turns out, I entered the wrong address for server IP address. I click on properties, and change this to the slave systems DNS name. Once complete, I go back to the servers tab, and see my red flag again. I click on start-up and the server is now online.

Figure 5. Servers with new Cluster Node
However, I can see that the message distribution service is still not running. When I go to enable it, I get the same error message about failing to start with an invalid SOAP IP. So I shut the slave server down, go back into the message distribution service tab, and enter the slave systems DNS name. Then I go back to general properties and click on enable for the message distribution service. I click on Apply, OK, and restart the slave server. Now it is online with the message distribution service. I am not sure if that is correct, but it started, so that is definitely a step in the right direction.
Once the server is online, I also set the new cluster server as the fail-over system for all the Actuate volumes. Now my cluster is complete. I verify this by going into the System Resource Group tab, and verifying that the appropriate numbers of factories are assigned to both servers.

Figure 6. System Resource Assignment
Tuesday, March 28, 2006
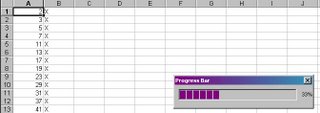
Excel: Progress Bar Indicator with VBA
There was a request for an Excel Progress bar with percentage indicator. While I personally don’t understand the need for something like that, I am happy to oblige.
Lets say we have this fictitious scenario. We have a spreadsheet with 65536 numbers in it. I want to go through each number, and in the cell next to it, put an ‘X’ if the number is a prime number. There will be a small form that pops up with a progress bar and percentage indicator while the macro is processing. I am purposely using a inefficient function for determining Prime Numbers so we can have a noticeable delay in the processing in order to demonstrate the Progress Bar indicator.
To start, create a new Excel worksheet. In Cell A1, put in the value of 1. Select all of Column A, go up to “Edit”, “Fill”, and select “Series”. This will fill out all of column a with the numbers 1 – 65536.
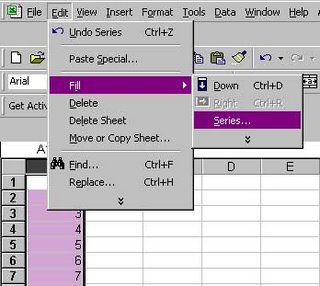
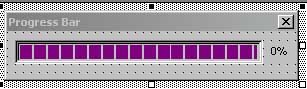
I will now create the progress bar itself on a user form. First, I go into the Excel Macro Editor, choose this workbook, go to the “Insert” menu at the top of the screen, and select UserForm. When the component toolbox opens up, I right mouse click on it and choose “Additional Controls”. (Alternatively, I could go up to the “Tools”/”Additional Controls” menu) From the list of components, I select “Microsoft Progress Bar Control 6.0 (SP4)”. I then draw a form with the progress bar and 1 text label, as illustrated below. One thing to be sure of is to set the UserForm1 property of “ShowModal” to false; otherwise the progress bar will display and sit without processing anything else in the script.
And below is the code for the Workbook.
Option Explicit
'Very basic function for finding is a number is prime. Just go through all numbers
'From 2 to 1/2 of the number and divide. If the number is divisible by any of those
'numbers, then it is not a prime number. Check for divisibility by 2 or 3 first to
'Try to speed things up just a little
Function isPrime(n As Long) As Boolean
Dim counter As Long
'ignore the values of 1, 2, and 3 and answer appropriately
If (n = 1) Then Exit Function
If (n = 2) Or (n = 3) Then
isPrime = True
Exit Function
End If
'If number is divisible by 2 or 3, it is not prime
If (n Mod 2 = 0) Then Exit Function
If (n Mod 3 = 0) Then Exit Function
'Go through remaining numbers, if divisible by any of them, it is
'not prime
For counter = 5 To (n / 2)
If (n Mod counter = 0) Then Exit Function
Next
'If we got this far, it must be a prime number
isPrime = True
End Function
Sub ProgressBarDemonstration()
'Used to track the last row in the worksheet
Dim LastRow, counter, percentage As Long
'Get the number of rows in this worksheet by using Excels internal countA function
'I use this instead of looking for blank cells because this has shown itself to be more accurate
If WorksheetFunction.CountA(Cells) > 0 Then
LastRow = Cells.Find(What:="*", After:=[A1], _
SearchOrder:=xlByRows, _
SearchDirection:=xlPrevious).Row
End If
'If there are no rows, exit out of the function
If LastRow = 0 Then
MsgBox "There are no rows in this worksheet", vbOKOnly
Exit Sub
End If
'Show the user the progress bar
UserForm1.Show
'On error, use the error handler to hide the progress bar
On Error GoTo err_handle
'For all numbers in the worksheet, find out if it is a prime number. If it is,
'put an X next to the number
For counter = 1 To LastRow
If isPrime(Cells(counter, 1).Value) Then
Cells(counter, 2).Value = "X"
End If
'Caluculate the percentage of completion
percentage = (counter / LastRow) * 100
'Update the progress bar and the text indicator
UserForm1.ProgressBar1.Value = percentage
UserForm1.lblPercent = Str(percentage) & "%"
'Do any background events so we don't leave the system unresponsive
DoEvents
Next
'Hide the progress bar when completed
UserForm1.Hide
Exit Sub
'Hide the progress bar in the event of an error
err_handle:
UserForm1.Hide
End Sub
When the code is run, a progress bar will display showing the functions progress.
Lets say we have this fictitious scenario. We have a spreadsheet with 65536 numbers in it. I want to go through each number, and in the cell next to it, put an ‘X’ if the number is a prime number. There will be a small form that pops up with a progress bar and percentage indicator while the macro is processing. I am purposely using a inefficient function for determining Prime Numbers so we can have a noticeable delay in the processing in order to demonstrate the Progress Bar indicator.
To start, create a new Excel worksheet. In Cell A1, put in the value of 1. Select all of Column A, go up to “Edit”, “Fill”, and select “Series”. This will fill out all of column a with the numbers 1 – 65536.

I will now create the progress bar itself on a user form. First, I go into the Excel Macro Editor, choose this workbook, go to the “Insert” menu at the top of the screen, and select UserForm. When the component toolbox opens up, I right mouse click on it and choose “Additional Controls”. (Alternatively, I could go up to the “Tools”/”Additional Controls” menu) From the list of components, I select “Microsoft Progress Bar Control 6.0 (SP4)”. I then draw a form with the progress bar and 1 text label, as illustrated below. One thing to be sure of is to set the UserForm1 property of “ShowModal” to false; otherwise the progress bar will display and sit without processing anything else in the script.

And below is the code for the Workbook.
Option Explicit
'Very basic function for finding is a number is prime. Just go through all numbers
'From 2 to 1/2 of the number and divide. If the number is divisible by any of those
'numbers, then it is not a prime number. Check for divisibility by 2 or 3 first to
'Try to speed things up just a little
Function isPrime(n As Long) As Boolean
Dim counter As Long
'ignore the values of 1, 2, and 3 and answer appropriately
If (n = 1) Then Exit Function
If (n = 2) Or (n = 3) Then
isPrime = True
Exit Function
End If
'If number is divisible by 2 or 3, it is not prime
If (n Mod 2 = 0) Then Exit Function
If (n Mod 3 = 0) Then Exit Function
'Go through remaining numbers, if divisible by any of them, it is
'not prime
For counter = 5 To (n / 2)
If (n Mod counter = 0) Then Exit Function
Next
'If we got this far, it must be a prime number
isPrime = True
End Function
Sub ProgressBarDemonstration()
'Used to track the last row in the worksheet
Dim LastRow, counter, percentage As Long
'Get the number of rows in this worksheet by using Excels internal countA function
'I use this instead of looking for blank cells because this has shown itself to be more accurate
If WorksheetFunction.CountA(Cells) > 0 Then
LastRow = Cells.Find(What:="*", After:=[A1], _
SearchOrder:=xlByRows, _
SearchDirection:=xlPrevious).Row
End If
'If there are no rows, exit out of the function
If LastRow = 0 Then
MsgBox "There are no rows in this worksheet", vbOKOnly
Exit Sub
End If
'Show the user the progress bar
UserForm1.Show
'On error, use the error handler to hide the progress bar
On Error GoTo err_handle
'For all numbers in the worksheet, find out if it is a prime number. If it is,
'put an X next to the number
For counter = 1 To LastRow
If isPrime(Cells(counter, 1).Value) Then
Cells(counter, 2).Value = "X"
End If
'Caluculate the percentage of completion
percentage = (counter / LastRow) * 100
'Update the progress bar and the text indicator
UserForm1.ProgressBar1.Value = percentage
UserForm1.lblPercent = Str(percentage) & "%"
'Do any background events so we don't leave the system unresponsive
DoEvents
Next
'Hide the progress bar when completed
UserForm1.Hide
Exit Sub
'Hide the progress bar in the event of an error
err_handle:
UserForm1.Hide
End Sub
When the code is run, a progress bar will display showing the functions progress.

Monday, March 27, 2006
Excel: File Open from VBA
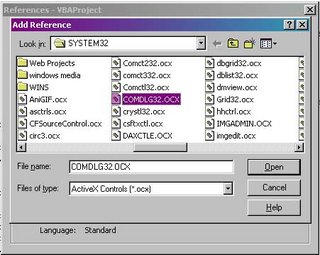
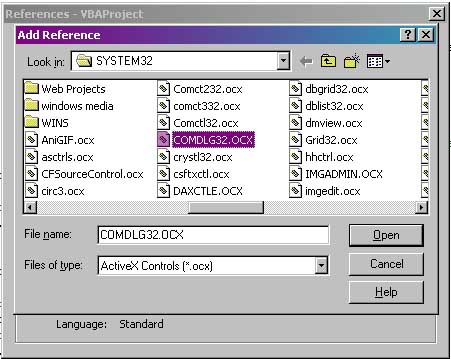
I had a question about calling the File Open Dialog from within an Excel VBA macro. The solution I present here is the path of least resistance by importing the ComDLG32.OCX file directly. The other option is to instantiate associated DLL files, and let me tell you, you don’t want to go that route. This will demonstrate how to prompt the user to get a file from within an Excel Macro. Alternatively, I will also show how to open an Excel Spreadsheet from within an Excel Macro.
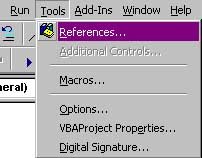
First, create a new Macro project. Once the project is open and you create a new function/sub program, go up to the Tools menu, and select References
.
Next select the Browse button, change the associated file type to OCX, and select the ComDLG32.OCX file. My system, by default, already defaults to the C:\Windows\System32 directory, if your does not, you will need to navigate to that location to file this file.
Once selected, the file will already be checked for inclusion in your project. Below is a code snippet that will prompt the user for the file, and display the selected file name in Column 1, Row 1 in the open Excel spreadsheet.
Sub PromptForFile()
Dim d As New MSComDlg.CommonDialog
d.ShowOpen
Cells(1, 1).Value = d.Filename
Set d = Nothing
End Sub
So, to build off of this concept, I will now have the Macro prompt a user for the filename, and then open that file within Excel. This accomplishes the same thing as the “File/Open” menu, but it is a simple enough example. Since the filename is stored in the Dialog object under the Filename field, all I need to do is call the Workbooks.open method to open the file. Below is the resulting code, which will filter all files except *.XLS files, and open the file that is selected.
Sub PromptForFile()
Dim d As New MSComDlg.CommonDialog
d.Filter = "xls"
d.Filename = "*.xls"
d.ShowOpen
Excel.Workbooks.Open d.Filename
Set d = Nothing
End Sub
Tuesday, March 21, 2006
A/V: Avia Guide to Home Theater
Ever since I was doing A/V work for a production company, I have been obsessed with perfecting my home theater setup. I enjoy tweaking the settings on my monitors and stereos to get the best possible experiences possible. Fortunately, I have come across “Avia Guide to Home Theater”, possibly one of the best calibration tools I have come across for home theater enthusiasts.
The Avia DVD is probably one of the easiest tools I have used for this purpose. I have tried other calibration DVD’s, however they only provide the patterns. Avia separates itself from these by actually walking your through, step by step, how to calibrate you audio and video setups.

Figure 1. Avia Main Menu
When you go through the Wizard, the first adjustment is the White Level Adjustment (Brightness). The way this adjustment works, you adjust the brightness control until the lines on the side no longer “bow” out. When the lines bow out, the guns are turned too high and you get picture distortion from bright images.

Figure 2. White Level Adjustment
Next, you adjust the contrast, or black level. The way this works is you adjust the picture for a “blacker than black” scenario, where the dark areas of the image should be dark. The test pattern itself has two slightly lighter than black lines dance across the screen on the black portion. You adjust the image so that the leftmost line is not visible, or barely visible, and the right line is a little more visible. The key to this adjustment is to set the lights in the viewing room to normal viewing levels. I deviate from this slightly, since I watch TV in the dark. So I adjust the image with the lights on.

Figure 3. Black Level Adjustment
Next is the sharpness adjustment. The trick to this adjustment is to look at the white space between the center cross. If there is a “ghost” image of the lines, almost forming a series of gray squares, and ghost lines following the vertical and horizontal lines, then the sharpness is too high. Adjust the image to the point where the ghost disappears. It also helps if the color controls (Tint and Color) are turned down or off.

Figure 4. Sharpness Control
Now you can adjust the color controls, probably the 2nd most overlooked controls next to the brightness and contrast controls. These should be familiar since color bars used to be broadcast for off air channels. The idea is to adjust the image with the red and green filtered out (Avia comes with color filters to put over your eyes while you do this), or if you are using a video projector, turn off the red and green guns. When Color and Tint are adjust properly, the image should form solid blue lines, and the center blinking spots should be barely noticeable.

Figure 5. SMPTE Color Bars

Figure 6. SMPTE with filters.
There are also Audio test tones for calibrating Surround Sound levels. These are meant to be adjusted with a sound meter (I use an old Radio Shack Sound Meter. The Model I use is discontinued, but they appear to have a newer model here. Analog is better here due to response time on the meters).
Alternatively, there are test patterns on certain THX DVD’s, but I don’t like these as much as the Avia DVD since to me the picture quality seems a little off for normal circumstances.
The Avia DVD is probably one of the easiest tools I have used for this purpose. I have tried other calibration DVD’s, however they only provide the patterns. Avia separates itself from these by actually walking your through, step by step, how to calibrate you audio and video setups.

Figure 1. Avia Main Menu
When you go through the Wizard, the first adjustment is the White Level Adjustment (Brightness). The way this adjustment works, you adjust the brightness control until the lines on the side no longer “bow” out. When the lines bow out, the guns are turned too high and you get picture distortion from bright images.

Figure 2. White Level Adjustment
Next, you adjust the contrast, or black level. The way this works is you adjust the picture for a “blacker than black” scenario, where the dark areas of the image should be dark. The test pattern itself has two slightly lighter than black lines dance across the screen on the black portion. You adjust the image so that the leftmost line is not visible, or barely visible, and the right line is a little more visible. The key to this adjustment is to set the lights in the viewing room to normal viewing levels. I deviate from this slightly, since I watch TV in the dark. So I adjust the image with the lights on.

Figure 3. Black Level Adjustment
Next is the sharpness adjustment. The trick to this adjustment is to look at the white space between the center cross. If there is a “ghost” image of the lines, almost forming a series of gray squares, and ghost lines following the vertical and horizontal lines, then the sharpness is too high. Adjust the image to the point where the ghost disappears. It also helps if the color controls (Tint and Color) are turned down or off.

Figure 4. Sharpness Control
Now you can adjust the color controls, probably the 2nd most overlooked controls next to the brightness and contrast controls. These should be familiar since color bars used to be broadcast for off air channels. The idea is to adjust the image with the red and green filtered out (Avia comes with color filters to put over your eyes while you do this), or if you are using a video projector, turn off the red and green guns. When Color and Tint are adjust properly, the image should form solid blue lines, and the center blinking spots should be barely noticeable.
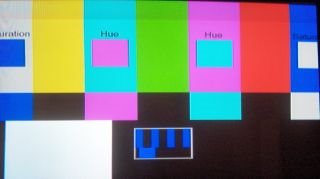
Figure 5. SMPTE Color Bars

Figure 6. SMPTE with filters.
There are also Audio test tones for calibrating Surround Sound levels. These are meant to be adjusted with a sound meter (I use an old Radio Shack Sound Meter. The Model I use is discontinued, but they appear to have a newer model here. Analog is better here due to response time on the meters).
Alternatively, there are test patterns on certain THX DVD’s, but I don’t like these as much as the Avia DVD since to me the picture quality seems a little off for normal circumstances.
Thursday, March 16, 2006
Security: Local Security Still a Problem
This is a little musing I have. Here I am in New York, sitting in a training class, and I am sitting at the one PC that is "broken". Of course my curiosity gets the better of me, and I turn the "broken" PC on to see what is wrong. To my suprise, its not broken, but it is using Linux instead of the SOE approved Windows. So I want to get into it so I can actually follow along in the sessions (yes, this is my real motivation). So how do I do it.
To my suprise, Grub is not locked down. So I go into the Grub menu, pass a "1" as a Kernel argument to launch into single user mode. Once I get my shell prompt, I created my user, ran passwd to create a password, then ran "init 5" to go into the graphical interface. So here I am, typing this blog entry on the "broken" PC. This just goes to show you how big of a problem local security can be, where an outside user can go in physically and create a user account and have full access to a system. Lesson learned, lock down your boot loader.
To my suprise, Grub is not locked down. So I go into the Grub menu, pass a "1" as a Kernel argument to launch into single user mode. Once I get my shell prompt, I created my user, ran passwd to create a password, then ran "init 5" to go into the graphical interface. So here I am, typing this blog entry on the "broken" PC. This just goes to show you how big of a problem local security can be, where an outside user can go in physically and create a user account and have full access to a system. Lesson learned, lock down your boot loader.
Monday, March 13, 2006
C++: Using ATOI for ASCII to Integer, and sprintf for Integer to String Conversions
There was someone who asked this question on a forum I read (students looking for help with their homework… what slackers, but I can relate since I was there once too):
I have a function X that needs to take in two parameters, and integer and a character. The function needs to replace the hundredths place in the integer with the value in the character. How can I do this?
The solution is actually pretty simple and requires a little math. I was convinced that there was some slick way to do this with bit masking, but I couldn’t figure it out. (Note: if someone has a solution for that, don’t hesitate to post it).
//Convert hundredths place to whatever single character digit
//is passed in
long hundredthsConversion(long n, char c)
{
//create an array of 2 characters, and initialize the first
//character to the value passed in to the function, and the
//second one to NULL
char temp[2] = {c, 0};
//integers to hold the converted ATOI result, and the value of
//N after stripping out the hundredths place
long digitConversion, n_strip_hundreds_digit;
//Convert this single digit numeral to a number, then multiply
//by 100. This will be added to n with the hundred digit striped
//out
digitConversion = (atoi(temp) * 100);
//Divide n by 100, than divide that result by 10, giving the number. Multiple that by 100 to give the value in the hundredths without
//values in the > 100 or the < 100 places
n_strip_hundreds_digit = (n - (( (n / 100) % 10) * 100));
//return the value without the hundredths and add in the single
//character for the hundredths place.
return n_strip_hundreds_digit + digitConversion;
}
I originally had the above as a single line equation, but separated it for clarity.
Alternatively, you could change the value in N to a string, and replace the 3rd to last value with the value in C, but for no good technical reason I don’t really like the idea off converting from one type back and forth. Also, Linux and *BSD do not have a native itoa function, so you would need to use sprintf to convert from an integer to a string. If I did use this method, however, it might look something like this (Note: comments striped for brevity, and function elongated for clarity of steps):
long hundredthsConversion(long n, char c)
{
char buffer[255];
int I;
for (I = 0; I < 255; I++)
buffer[I] = 0;
sprintf(buffer, “%d”, n);
I = strlen(buffer);
switch(i)
{
case 1:
buffer[2] = buffer[0];
buffer[0] = c;
buffer[1] = ‘0’;
break;
case 2:
buffer[2] = buffer[1];
buffer[1] = buffer[0];
buffer[0] = c;
break;
default:
buffer[I – 3] = c;
break;
}
return atol(buffer);
}
Both functions compiled under the GNU C++ Compiler using only iostream and the standard namespace. Under C, you would need to include the appropriate headers for atoi and sprintf.
Friday, March 10, 2006
Database: Various Methods to Use Dates From Tables as Parameters for Queries
I had someone ask me the following question:
How can I use a date value as a variable for another query? For example: select * from XXX where startdate = XXXX;
There are actually a few ways to do this. I will cover the easier ones here. There are 3 ways to do this, either through a join, through a sub query, or through an exists statement.
To use the join method, you would so something like this:
Select
‘X’
from
table1, table2
where
table1.startdate = table2.startdate;
Now there is a little caveat in working with dates in databases, in particular I will use Oracle to demonstrate this. Lets say we have 2 tables, table1 and table2, both with 1 field called startdate. The tables contains the following data:
SQL> select startdate from table1;
STARTDATE
---------
10-MAR-06
15-MAR-06
04-APR-06
10-MAR-06
SQL> select startdate from table2;
STARTDATE
---------
10-MAR-06
Now, if we use the above query we should get 2 results back, right? Well, lets try it and see:
SQL> Select
2 'X'
3 from
4 table1, table2
5 where
6 table1.startdate = table2.startdate;
no rows selected
So why didn’t we get any results back? The answer is because Oracle stored date fields as both Date and Time. By default, if a time is not specified, midnight is assumed. Because of this, between statements may not work as expected. So to fix the above query, I will change it to a ‘DD-MON-YYYY’ format so they will match. Lets see what happens when I do this.
1 Select
2 'X'
3 from
4 table1, table2
5 where
6* to_char(table1.startdate, 'DD-MON-YYYY') = to_char(table2.startdate, 'DD-MON-YYYY')
SQL> /
'X'
--------------------------------
X
X
And these are the results I wanted to see. The second method is using a sub query. This can be a little trickier than using a join since sub query as results require that only 1 result be returned in order to match. Lets look at an example:
1 SELECT
2 'X'
3 FROM
4 table1
5 WHERE
6 to_char(startdate,
7 'DD-MON-YYYY'
8 ) = (
9 SELECT
10 TO_CHAR(startdate,
11 'DD-MON-YYYY'
12 )
13 FROM
14 table2
15* )
SQL> /
'X'
--------------------------------
X
X
This is what we expect, but that is only because table2 has only 1 value in it. What happens if table2 has data like so:
SQL> select startdate from table2;
STARTDATE
---------
10-MAR-06
10-MAR-06
10-MAR-06
SQL> SELECT
2 'X'
3 FROM
4 table1
5 WHERE
6 to_char(startdate,
7 'DD-MON-YYYY'
8 ) = (
9 SELECT
10 TO_CHAR(startdate,
11 'DD-MON-YYYY'
12 )
13 FROM
14 table2
15 )
16 /
SELECT
*
ERROR at line 9:
ORA-01427: single-row subquery returns more than one row
Suddenly, the subquery does not work. This can be fixed by adding a distinct clause to the sub query. So it will look like this:
1 SELECT
2 'X'
3 FROM
4 table1
5 WHERE
6 to_char(startdate,
7 'DD-MON-YYYY'
8 ) = (
9 SELECT
10 distinct TO_CHAR(startdate,
11 'DD-MON-YYYY'
12 )
13 FROM
14 table2
15* )
SQL> /
'X'
--------------------------------
X
X
Alternative to this, you can also use an EXISTS statement to retrieve your results. To do so, the query would look like so:
1 SELECT
2 table1.startdate
3 FROM
4 table1
5 WHERE
6 exists (
7 SELECT
8 'X'
9 FROM
10 table2
11 where
12 to_char(table2.startdate, 'DD-MON-YYYY') = to_char(table1.startdate, 'DD-MON-YYYY')
13* )
SQL> /
STARTDATE
---------
10-MAR-06
10-MAR-06
Assuming we have an index on both tables, the execution plan for the first join minus he to_char() function would be:
Execution Plan
----------------------------------------------------------
0 SELECT STATEMENT Optimizer=CHOOSE (Cost=1 Card=3 Bytes=42)
1 0 NESTED LOOPS (Cost=1 Card=3 Bytes=42)
2 1 INDEX (FULL SCAN) OF 'TBL2' (NON-UNIQUE) (Cost=1 Card=3
Bytes=21)
3 1 INDEX (RANGE SCAN) OF 'TBL1' (NON-UNIQUE)
With the function added it would look like:
Execution Plan
----------------------------------------------------------
0 SELECT STATEMENT Optimizer=CHOOSE (Cost=5 Card=1 Bytes=14)
1 0 HASH JOIN (Cost=5 Card=1 Bytes=14)
2 1 TABLE ACCESS (FULL) OF 'TABLE2' (Cost=2 Card=3 Bytes=21)
3 1 TABLE ACCESS (FULL) OF 'TABLE1' (Cost=2 Card=4 Bytes=28)
Hmm, so by adding the function, we have increased the cost. What about with the sub query?
Execution Plan
----------------------------------------------------------
0 SELECT STATEMENT Optimizer=CHOOSE (Cost=2 Card=1 Bytes=7)
1 0 TABLE ACCESS (FULL) OF 'TABLE1' (Cost=2 Card=1 Bytes=7)
2 1 SORT (UNIQUE) (Cost=5 Card=3 Bytes=21)
3 2 TABLE ACCESS (FULL) OF 'TABLE2' (Cost=2 Card=3 Bytes=2
1)
Hmm, the cost is slightly lower, even with the functions and the distinct clause. So what does it look like with the EXISTS statement?
Execution Plan
----------------------------------------------------------
0 SELECT STATEMENT Optimizer=CHOOSE (Cost=5 Card=1 Bytes=14)
1 0 HASH JOIN (SEMI) (Cost=5 Card=1 Bytes=14)
2 1 TABLE ACCESS (FULL) OF 'TABLE1' (Cost=2 Card=4 Bytes=28)
3 1 TABLE ACCESS (FULL) OF 'TABLE2' (Cost=2 Card=3 Bytes=21)
In reality the results would be much different if Oracles Function based Indexes were turned on, and if the tables were much larger where the Cost Based Optimizer would actually determine that an index would be faster than a full table scan. I personally would prefer the join method for these examples, but your mileage may vary. The various execution plans and reasons for Full Table Scans illustrate some of the complexities with working with Oracle. Different database platforms will have a different set of problems. For example, Microsoft Access, although supporting EXISTS statements, have been a source of unexpected results, which leads me to believe the support is not complete. Certain DBMS platforms separate date and time types, so having to convert to a date only format to compare will be unnecessary on certain platforms. Some platforms may not support sub queries, or the EXISTS statement. So take these things into consideration when designing your queries and consult documentation on what features are supported on your platform. I hope this helps.
Thursday, March 09, 2006
ASM: Working with the Video Palette
I finally figured out how I screwed up this little program I wrote in ASM. I was trying to experiment a little with working with the color palette, and I finally remembered that in mode 13h, the 256 color palettes RGB components are actually 6 bits, not 8 bits. So when I was looping through 0 to 256, it caused all sorts of unexpected behaviors. What a PITA.
Anyway, below is the final result. This program doesn’t do anything really fancy. It simply switches to mode 13h, colors the screen all 1-palette entry, and then gradually increases the palettes blue byte from min to max, causing the screen as a while to go from black to blue. This also gave me a chance to work with the DOS interrupt for retrieving the time to cause a slight delay in the loop.
0BD0:0100 B81300 MOV AX,0013
0BD0:0103 CD10 INT 10
0BD0:0105 B800A0 MOV AX,A000
0BD0:0108 8ED8 MOV DS,AX
0BD0:010A 8EC0 MOV ES,AX
0BD0:010C 31FF XOR DI,DI
0BD0:010E B80303 MOV AX,0303
0BD0:0111 B9F000 MOV CX,00F0
0BD0:0114 51 PUSH CX
0BD0:0115 B9A000 MOV CX,00A0
0BD0:0118 F3 REPZ
0BD0:0119 AB STOSW
0BD0:011A 59 POP CX
0BD0:011B E2F7 LOOP 0114
0BD0:011D 31DB XOR BX,BX
0BD0:011F FEC7 INC BH
0BD0:0121 B94000 MOV CX,0040
0BD0:0124 BAC803 MOV DX,03C8
0BD0:0127 B003 MOV AL,03
0BD0:0129 EE OUT DX,AL
0BD0:012A 42 INC DX
0BD0:012B B000 MOV AL,00
0BD0:012D EE OUT DX,AL
0BD0:012E EE OUT DX,AL
0BD0:012F 88F8 MOV AL,BH
0BD0:0131 EE OUT DX,AL
0BD0:0132 FEC7 INC BH
0BD0:0134 90 NOP
0BD0:0135 90 NOP
0BD0:0136 50 PUSH AX
0BD0:0137 53 PUSH BX
0BD0:0138 51 PUSH CX
0BD0:0139 52 PUSH DX
0BD0:013A B42C MOV AH,2C
0BD0:013C CD21 INT 21
0BD0:013E 89D3 MOV BX,DX
0BD0:0140 BA1200 MOV DX,0012
0BD0:0143 01D3 ADD BX,DX
0BD0:0145 CD21 INT 21
0BD0:0147 39D3 CMP BX,DX
0BD0:0149 7DFA JGE 0145
0BD0:014B 5A POP DX
0BD0:014C 59 POP CX
0BD0:014D 5B POP BX
0BD0:014E 58 POP AX
0BD0:014F E2D3 LOOP 0124
0BD0:0151 B80300 MOV AX,0003
0BD0:0154 CD10 INT 10
0BD0:0156 B8004C MOV AX,4C00
0BD0:0159 CD21 INT 21
So lets go through each section of the program.
0BD0:0100 B81300 MOV AX,0013
0BD0:0103 CD10 INT 10
This section, of course, switches the video mode to mode 13h, which is 320x240x256.
0BD0:0105 B800A0 MOV AX,A000
0BD0:0108 8ED8 MOV DS,AX
0BD0:010A 8EC0 MOV ES,AX
0BD0:010C 31FF XOR DI,DI
Here I am setting up ES:DI to point to the video memory at A000:0000 so I can draw directly to the screen. This is much faster than using the BIOS interrupts to draw to the screen.
0BD0:010E B80303 MOV AX,0303
0BD0:0111 B9FF0F MOV CX, 00F0
Here I am setting up my AX register to put palette entry number 3 to the screen. I am using the full word size so the program will only have to loop half the number of times. Then I am setting up CX to loop 240 times, which is the vertical resolution. This will loop another loop that will execute 320 times. So the inside loop will actually loop a total number of 76800 times. I could have set up a single loop to execute once instead of doing the outer loop, inner loop code, but I wanted to work with a few extra instructions.
0BD0:0114 51 PUSH CX
0BD0:0115 B94001 MOV CX, 00A0
0BD0:0118 F3 REPZ
0BD0:0119 AB STOSW
0BD0:011A 59 POP CX
0BD0:011B E2F7 LOOP 0114
This is the inner loop. First I push the value of CX to the stack so we do not lose the value of the outer loops counter. Then I move the value of 160 (A0h) into CX to represent the horizontal resolution (I’ll explain why in a minute). Then I am going to repeat the STOSW instruction the 160 times, which will put the value of AX (0303) into the memory pointed to by ES:DI (A000:0000). So why use 160 instead of the horizontal resolution of 320? The reason is that I am using a word instruction (STOSW) instead of a byte instruction (STOSB). So I only need to loop through the inner loop half as many times since I am working with a larger unit of data. Once the inner loop is complete, I retrieve the current value of the outer loop counter from the stack, and loop back to the PUSH instruction. This will automatically decrease that outer loop counter by 1, and repeat the inner loop again.
0BD0:011D 31DB XOR BX,BX
0BD0:011F FEC7 INC BH
0BD0:0121 B94000 MOV CX,0040
What I am doing here is preparing another loop to ramp up through the blue spectrum for the palette entry I drew to the screen. First I clear out BX using the XOR technique, then I increment BH by 1. I could have simply moved 0100h into BX, but I wanted to demonstrate the XOR technique, and using the INC instruction. Then I move the value of 64 (40h) into CX. This represents the full spectrum of blue.
0BD0:0124 BAC803 MOV DX,03C8
0BD0:0127 B003 MOV AL,03
0BD0:0129 EE OUT DX,AL
Here I am getting ready to work directly with the VGA cards IO port. Port 3c8h tells the video card that I want to set a palette entry, which is set in register AL. Then I use the OUT instruction to output to that port.
0BD0:012A 42 INC DX
0BD0:012B B000 MOV AL,00
0BD0:012D EE OUT DX,AL
0BD0:012E EE OUT DX,AL
0BD0:012F 88F8 MOV AL,BH
0BD0:0131 EE OUT DX,AL
0BD0:0132 FEC7 INC BH
Now we will output the new palette entries directly to the video card. Rather than moving the port 3c9 into DX, I simply increase it by 1. This method, however, will not work when reading from the palette since the signal port to read from the VGA card is 3c7 and the data port is 3c9. Next I set AL to 0, since I want red and green to be absent from the increase in color. I could have XORed AL, but I wanted to demonstrate moving 0 into AL as an alternative method. If we compare the size, we see that an XOR and a MOV are roughly the same size. Word of mouth is that XOR two registers to zero them is slightly faster, but I have never been able to confirm this myself. Now that AL is set, I output the red and green values with the two OUT instructions. Then I move BH to AL, since I am using BH to store the current value that I want to set blue to. Once I OUT to the VGA card, I increase BH by 1 for the next iteration of the loop.
0BD0:0134 90 NOP
0BD0:0135 90 NOP
This little bit of code was a booboo that I fixed. I had left in an instruction that was unnecessary, so I replaced that instruction with 2 NOP instructions. This is a useful instruction to keep in mind if you get into software cracking. I won’t elaborate on why that is though ;)
0BD0:0136 50 PUSH AX
0BD0:0137 53 PUSH BX
0BD0:0138 51 PUSH CX
0BD0:0139 52 PUSH DX
0BD0:013A B42C MOV AH,2C
0BD0:013C CD21 INT 21
0BD0:013E 89D3 MOV BX,DX
0BD0:0140 BA1200 MOV DX,0012
0BD0:0143 01D3 ADD BX,DX
0BD0:0145 CD21 INT 21
0BD0:0147 39D3 CMP BX,DX
0BD0:0149 7DFA JGE 0145
0BD0:014B 5A POP DX
0BD0:014C 59 POP CX
0BD0:014D 5B POP BX
0BD0:014E 58 POP AX
0BD0:014F E2D3 LOOP 0124
Now this whole section of code is a little tricky to understand. First I push all registers into the stack. One higher processors, there is a PUSHA instruction that will do this automatically, but the 80x86 that is being emulated in debug does not have this instruction, so I have to do it manually. Keep track of which order registers are pushed into the stack since the stack is a Last In-First Out data structure. So when I pop the registers again, DX will be the first one out.
Next I prepare to call DOS function 2C. Most DOS functions are under Interrupt 21h. This will get the current time, and store them in several registers. However, I am only interested in register DX, which stores the seconds and milliseconds. I move DX into register BX for later comparison. Next I move the value of 12h (18) into DX and add it into register BX. The reason I did this is because for some bizarre reason, adding directly was causing bugs to occur in this routine. Then I call the function again, compare against the value in BX. If the current time has exceeded the time stored in BX after the addition of 18 milliseconds, then the loop can continue, otherwise, repeat the loop until it does. While this is not exactly the most effective way to do a delay, it works for this program. Once complete, restore the values of all the registers. Then, I loop all the way back up to the code outputting the data to the VGA port.
0BD0:0151 B80300 MOV AX,0003
0BD0:0154 CD10 INT 10
0BD0:0156 B8004C MOV AX,4C00
0BD0:0159 CD21 INT 21
This will set the video mode back to 80x25 text mode and exit to DOS.
Although many consider DOS to be obsolete, I find that DOS has incredible educational value. Since DOS is not as controlled as current OS’s, you can directly access memory and hardware for experimentation. While in its heyday, this was the cause of many of the headaches of working with DOS, it also helps students understand the fundamentals of hardware IO in an unrestricted environment. I have yet to build me a lab PC with DOS on it to build some circuits I want to demonstrate and control them via the PC Parallel port. For the time being I will have to live with working in VMWare and hold off on the circuits.
Wednesday, March 08, 2006
Opinion: VB is Not a Suitable Language for Beginners
There was an interesting discussion over at Slashdot about using Visual Basic as a starter language. I personally do not think that VB is a language suited to a beginner programmer and any serious beginner should start off in a language that forces structure upon them. I recommend Pascal, but then again, I am biased since it was the language I learned on. Languages like Visual Basic, C++, Perl, and Java are either too complicated, contain too many gotchas, or are unstructured to be effective as a teaching language. Things like the default for VB allowing for undeclared variables is something of a turn-off in my opinion.
Tuesday, March 07, 2006
VMWare Floppy Images via Cygwin and WinImage
I needed a break from ASM articles, and I was in the process of installing Turbo C 2.01, Turbo C++ 1.1, and Turbo Pascal 5.5 (all free from the Borland Museum) onto a DOS 6.22 virtual machine under VMWare. The problem I ran into is that I am using an old Toshiba Tecra 8100 laptop, and have misplaced the floppy drive for it (or rather, I just don’t carry it with me). Since this is a stock DOS 6.22 install, I do not have the CDROM drivers installed either, so I needed a quick way to create floppy images to mount from within VMWare. Fortunately, with the help of Cygwin and WinImage, I was able to do this without a problem.
First, I created the 1.44 MB disk images using the DD utility in Cygwin. I didn’t use Winimage for this since I needed this as a DOS based disk image formatted using FAT. To create the image files, I ran the following command:
dd if=/dev/zero of=./tcd1.img bs=1k count=144
The tcd1.img stands for Turbo C Disk 1 just for clarification. I repeat this process 3 times to create 3 floppy disk images. Next, I open the floppy disk images from VMWare so they are visible to DOS. This is necessary since Cygwin does not appear to be able to mount floppy images, nor does it come with the MKDOSFS utility (or else I don't have either option installed, which is possible). I already have DOS started at this time from within VMWare, so to mount the floppy image, I go up to “VM”, “Removable Devices”, “Floppy 1”, and “Edit”. Once the file dialog pops up, I point it to tcd1.img.
Inside of DOS, I simple issue the following command to format the disk:
format a:
I repeat the same process for all 3 floppy disks. Now that these images are formatted, I can open them up with WinImage, copy the files I need, save the image, remount them in VMWare, and install the program. WinImage definitly is a decent tool that makes up for the inability to mount floppy images from Cygwin.
This is great since I can create disk images for my DOS setup and not actually have to carry around floppy disks. WinImage also creates CD-ROM ISO’s, so this might be a useful utility to keep around.
Friday, March 03, 2006
ASM: Sprawling Palette across the Screen
I was reading today’s Penny Arcade, and Tycho makes an interesting statement about “loving the … savage and untamed qualities” and “being drawn to the stark brutalities” of the PC. I think that about sums up my fascination with Assembly as of late. Maybe I am a glutton for punishment. I couldn’t imagine trying to write an entire operating system in this, and I probably would flock to the nearest high level language available, but it is fun to digress to the primitive, low level lands of the microprocessor architecture every now and then. But it would be nice to work with a “polished” interface such as OS X and escape PC hell for a while, but that still a ways away for me. Once I find my old Turbo C disks, I intend on salvaging a few of the old PC boxes I have in my closet to work on some basic DOS based projects, going almost completely in the opposite direction. I am thinking of trying to simulate a basic parallel port communications session from the ground up with a program written in mixed C/Inline ASM. Not real exciting by today’s standards, but still, I haven’t worked on projects like that since I was studying electronics at the local community college. Well, continuing with my adventures in Asm land, I wrote this little program that will simply sprawl out the existing palette across the screen.
0BD0:0100 B81300 MOV AX,0013
0BD0:0103 CD10 INT 10
0BD0:0105 B800A0 MOV AX,A000
0BD0:0108 8EC0 MOV ES,AX
0BD0:010A 31FF XOR DI,DI
0BD0:010C B9C800 MOV CX,00C8
0BD0:010F 51 PUSH CX
0BD0:0110 31C0 XOR AX,AX
0BD0:0112 B94001 MOV CX,0140
0BD0:0115 AA STOSB
0BD0:0116 FEC0 INC AL
0BD0:0118 E2FB LOOP 0115
0BD0:011A 59 POP CX
0BD0:011B E2F2 LOOP 010F
0BD0:011D B410 MOV AH,10
0BD0:011F CD16 INT 16
0BD0:0121 B80300 MOV AX,0003
0BD0:0124 CD10 INT 10
0BD0:0126 B8004C MOV AX,4C00
0BD0:0129 CD21 INT 21
Lets break it apart.
MOV AX,0013
INT 10
This will change the video resolution into 320x240x256.
MOV AX,A000
MOV ES,AX
XOR DI,DI
Setting up ES:DI for quick access to video memory.
0BD0:010C B9C800 MOV CX,00C8
0BD0:010F 51 PUSH CX
This is setting up my “outer loop”. What I am going to do it loop through the each color in the pallete 200 times. C8 is the hex value for 200. I push it onto the stack so that I do not mess up the count with anything in the inner loop.
0BD0:0110 31C0 XOR AX,AX
0BD0:0112 B94001 MOV CX,0140
Here I am setting up my inner loop. First, I zero out AX, so I can start with the first position in the pallete. Then I set the counter in the inner loop to 140, which is hex for 320. I will rollover since the pallete only contains 256 colors, but that’s OK for what I am trying to do here.
0BD0:0115 AA STOSB
0BD0:0116 FEC0 INC AL
0BD0:0118 E2FB LOOP 0115
Now, I take the value in AX, which is indicating which pallete array element to use, and store that into ES:DI, and DI is automatically incremented by 1 with the STOSB instruction. I increase AL so I can use the next value in the pallete on the next pass, and loop back to the STOSB instruction all 320 times as stored in register CX.
0BD0:011A 59 POP CX
0BD0:011B E2F2 LOOP 010F
Now, since I am done with the inner loop, I get my outer loop counter value back from the stack, and loop back to the outer loops PUSH CX statement. The loop statement will decrement CX by 1 automatically.
0BD0:011D B410 MOV AH,10
0BD0:011F CD16 INT 16
I will wait for a key press from the user so they can see the sprawled pallete.
0BD0:0121 B80300 MOV AX,0003
0BD0:0124 CD10 INT 10
0BD0:0126 B8004C MOV AX,4C00
0BD0:0129 CD21 INT 21
Set the video mode back to mode 3, and return to DOS. Pretty cool little program for only 43 bytes. Next I am going to try to do a pallete rotation on the colors, but I will leave that for a future article.
Subscribe to:
Posts (Atom)

